47. Dedicated server support
This documentation explains how to build a game service using the client engine’s dedicated server features. You can use dedicated server features of UnrealEngine 4 and Unity with iFun Engine.
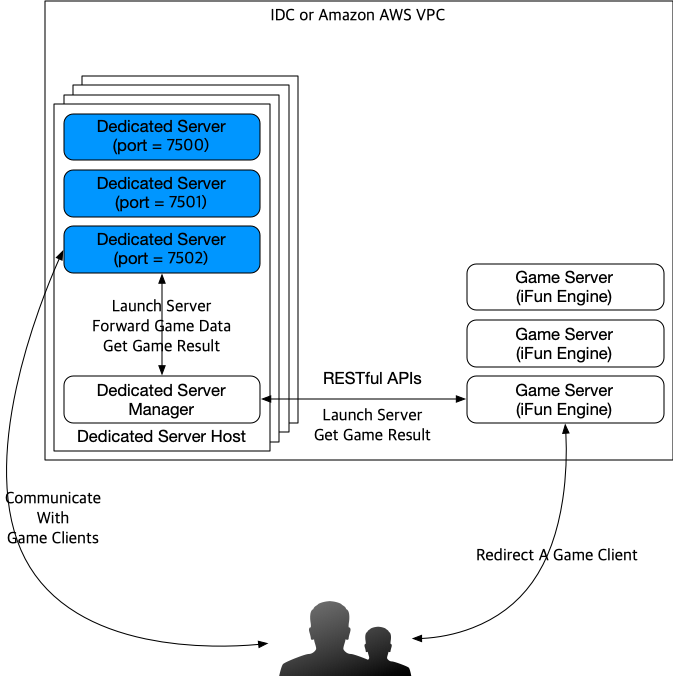
A physical or virtual machine that launches dedicated servers is called a dedicated server host. These make it possible for users to undergo a series of processes to access iFun Engine as a dedicated server.
(Server) iFun Engine spawns a dedicated server with additional data.
iFun Engine collects users to send to a single dedicated server along with additional data.
Selects dedicated server host and begins dedicated server process.
Running dedicated servers
Begins the dedicated server process
Sends command line argument to the client plugin to perform the required initialization
Invokes particular plugin functions and finishes preparations when the dedicated server is ready
Invokes startup complete callback on the iFun Engine server side and sends access data to the client.
(Client) Receives plugin callback to access the dedicated server and play the game.
(Dedicated server) Sends game results from the dedicated server when the game ends.
47.1. Changing server settings
Add the following to MANIFEST.json to use dedicated server features.
"DedicatedServerManager": {
}
47.2. Dedicated server manager
47.2.1. Installing the dedicated server manager
The same Linux environments as iFun Engine are supported along with MS Windows.
47.2.1.1. Installing in Linux
Ubuntu Linux
$ sudo apt-get install -y funapi1-dedicated-server-host
CentOS
$ sudo yum install -y funapi1-dedicated-server-host
47.2.1.2. Installing in MS Windows
Tests have been run in Windows 10 (x64) 64-bit Python 2.7.14.
First, download and install Python for MS Windows. (Please select latest release of Python 2.7.)
Assuming Python is installed by default in
c:\Python27, enter the following commands into a command line to install the required package.C:\> C:\Python2.7\Script\pip.exe install flask gevent netifaces ^ python-gflags requests redis sixNote
^ is the line continuation character for MS-DOS batch files. Enter on one line.
Download the dedicated server manager, install where you want it, and unzip it.
47.2.2. Configuring the dedicated server manager
Set up the configuration file as follows.
Set your dedicated server engine type (ue4 or unity)
Set network interface to receive game client connections
Set network interface to receive iFun Engine game server commands
Redis server address. The redis server must be shared with iFun Engine.
Dedicated server executable location
In Linux, the configuration file is in
/etc/funapi-dedicated-server-host/funapi-dedicated-server-host.flag. You can confirm the directory to unzip the file in MS Windows.
47.2.2.1. Linux example
# Lines that begins with the '#' are ignored.
# You should update binary_path to your dedicated server executable's location.
--binary_path=/var/lib/your/dedicated-server/binary

# Engine type. Possible values are 'ue4' (UnrealEngine4) and 'unity' (Unity).
--engine_type=ue4

# Also, you should update redis_host, redis_port to match the redis address.
--redis_host=127.0.0.1
--redis_port=6379

# If you want to bind the specific NIC for clients, update the following lines.
# And you may choose another NIC for inter-server communication.
# eg) You may use eno1 for games, and eno2 for inter-server communication.
# Depends on your OS, NIC name can be varying - eg) eth0, eno1, ens1, enp2s0.
--game_interface=eth0
--restful_interface=eth1
Dedicated server binary is an executable file called /var/lib/your/dedicated-server/binary, and the
Redis server is a configuration file hosted at 127.0.0.1:6379.
The game client communicates with eth0, and if it communicates with the iFun Engine game server with
eth1, you can set it up as above.
47.2.2.2. Linux 환경에서의 Unreal Engine 4 권한 설정하기
Important
리눅스 운영체제에서 Unreal Engine 4 로 개발한 데디케이티드 서버를 실행하기 위해서는 데디서버 호스트 매니저를 root 가 아닌 일반 사용자 권한으로 실행해야 합니다. 그렇지 않을 경우, 데디케이티드 서버 실행에 실패합니다.
데디케이티드 서버 매니저 설치로 생성된 서비스 파일을 복사하여 유저 권한의 서비스 목록에 추가합니다.
$ sudo cp /lib/systemd/system/funapi-dedicated-server-host.service \
/usr/lib/systemd/user/funapi-dedicated-server-host.service
Note
\ 문자는 bash 의 줄 이어짐 문자입니다. 한 줄로 입력하시면 됩니다.
그리고 복사된 서비스 파일을 열어 14~15 line 의 User=root, Group=root 를 제거합니다.
# NOTE: It's strongly recommended that one should use uid:gid other than root

User=root   # remove
Group=root  # remove

Type=simple
Restart=on-failure
RestartSec=5s
47.2.2.3. MS Windows example
MS Windows uses the game_ip and restful_ip parameters. (It does not use the interface parameter.)
These values must be set in order to connect properly.
# Lines that begins with the '#' are ignored.
# You should update binary_path to your dedicated server executable's location.
--binary_path=D:\ShooterGame\ShooterGame.exe

# Engine type. Possible values are 'ue4' (UnrealEngine4) and 'unity' (Unity).
--engine_type=ue4

# Also, you should update redis_host, redis_port to match the redis address.
--redis_host=127.0.0.1
--redis_port=6379

# For Microsoft Windows, you must use following flags, instead of
# game_interface or restful_interface.
# IP addresses used by game clients and game servers respectively.
--game_ip=10.0.0.7
--restful_ip=10.10.1.7
Tip
If you want to pass additional arguments to the dedicated server, specify the script file
(.sh or .bat depending on OS) instead of the --binary_path executable location
and add arguments from that file.
You can also use the UE4 editor to set up launch without packaging during development. Here is an example: (Using a .bat file in MS Windows)
REM exmple batch file, which utilizes UE4 editor to launch dedicated server

"C:\Program Files\Epic Games\4.14\Engine\Binaries\Win64\UE4Editor.exe" ^
  "C:\Work\apps-ue4-dedi-server-example\ShooterGame\ShooterGame.uproject" ^
  HighRise -skipcompile -server -log ^
  %*
Use the UE4 editor to launch the dedicated server and add HighRise to be sent as the map name.
When sending values that need to be changed for each game, like map name and game mode,
use the DedicatedServerManager::SendUsers() function’s
server_args as in the next section.
47.2.3. Running the dedicated server manager
Running in Ubuntu 16.04/CentOS 7
First, activate the service with the following command:
# Unity

$ sudo systemctl daemon-reload
$ sudo systemctl enable funapi-dedicated-server-host

# Unreal Engine 4

$ systemctl --user daemon-reload
$ systemctl --user enable funapi-dedicated-server-host
Then start the service.
# Unity

$ sudo systemctl start funapi-dedicated-server-host

# Unreal Engine 4

$ systemctl --user start funapi-dedicated-server-host
Running in Ubuntu 14.04
Execute the service as follows:
$ sudo start funapi-dedicated-server-host
Running in MS Windows
Configure the data in funapi-dedicated-server-host.flag, then run the
command below in the directory with the funapi_dedicated_server folder.
This assumes unzipping in the D:\DedicatedServerHost directory.
D:\DedicatedServerHost> C:\Python2.7\python.exe -m funapi_dedicated_server ^
    --flagfile=funapi-dedicated-server-host.flag
Note
^ is the line continuation character for MS-DOS batch files. Enter on one line.
47.3. Starting games
Invoke the following function on the game server:
#include <funapi/service/dedicated_server_manager.h>

void start_callback(const fun::Uuid &match_id,
                    const std::vector<std::string> &accounts,
                    bool success) {
  // Do anything after dedicated game server started.
  // You may handle the failed spawning of dedicated game server here.
}


DedicatedServerManager::Spawn(
    match_id,
    game_data,
    server_args,
    accounts,
    user_data,
    start_callback);
Parameters have the following meanings:
fun::Uuid match_id: The unique ID for each dedicated server instance. This ID is also used when receiving results after the game is played.fun::Json game_data: JSON data received and used from the dedicated server. Put data needed to start the game here.std::vector<std::string> server_args: Set arguments to be sent to the dedicated server executable file. For example, if a map must be selected, pass it asmap=blahblah?opt1=1&opt2=2.std::vector<std::string> accounts: Send user account IDs managed byAccountManager. iFun Engine will automatically notify dedicated server address to clients.std::vector<fun::Json> user_data: Per-user data. The ``user_data.size()`` should be equal to ``accounts.size()``.start_callback: Callback function invoked upon game success/failure to start.
If the host launching the dedicated server executes successfully, access data (address, token, etc.) is sent to individual clients after the callback function is invoked. The individual client can access the dedicated server to play the game.
47.3.1. Sending users to already started game
You may send user(s) to ongoing game by using DedicatedServerManager::SendUsers API.
static void SendUsers(const fun::Uuid &match_id,
                      const fun::Json &match_data,
                      const std::vector<std::string> &accounts,
                      const std::vector<fun::Json> &user_data,
                      const SendCallback &callback);
You may call DedicatedServerManager::SendUsers() with the same arguments as
Spawn() – except game_data argument.
47.4. Handling dedicated servers (Unreal Engine 4)
You can find Unreal Engine 4 example at GitHub. Also, you can find Unity Eample at GitHub .
Required elements to communicate with the iFun Engine server are gathered and provided
as fun::FunapiDedicatedServer class member functions.
47.4.1. Handling command line arguments
Invoke the code below to read command line arguments. The code below needs to be invoked to read data sent from the game server or game results sent to the game server. The applicable function is as follows:
bool ParseConsoleCommand(const TCHAR* cmd,
                         const FString &match_id_field,
                         const FString &manager_server_field);
If not all required parameters can be obtained, false is returned.
If executed as follows, the required arguments are automatically analyzed.
fun::FunapiDedicatedServer::ParseConsoleCommand(FCommandLine::Get());
If you want to use command line arguments for the dedicated server other than the default values, invoke them as follows:
fun::FunapiDedicatedServer::ParseConsoleCommand(
    FCommandLine::Get(),
    "FunapiMatchID",        // Argument for match id.
    "FunapiManagerServer",  // Server address for dedicated server manager.
  );
47.4.2. Fetching required data
You can invoke the following function to fetch data sent from the game server to the dedicated server. After fetching this data, you can perform the required reset inside the callback function.
void GetGameInfo(
    const TFunction<void(FHttpResponsePtr response)> &completion_handler);
For example, set up and invoke the callback function as follows:
// After fetching the data, this callback function will be called.
void OnDataReceived(FHttpResponsePtr response) {
  // Response has data in JSON format, which was sent by the game server.
}

// Fetches the data.
fun::FunapiDedicatedServer::GetGameInfo(OnDataReceived);
47.4.3. Sending notification when the dedicated server is ready
Once the dedicated server has been initialized, invoke the following function to notify the dedicated server manager so the client can access it.
fun::FunapiDedicatedServer::PostReady();
47.4.4. Handling user authentication
This function is only valid after GetGameInfo() is called.
A function to authenticate users is provided at UE4’s PreLogin stage.
Invoke the following function to handle authentication after client access.
Use FunapiUID and FunapiToken as user ID and authentication token field names.
If you need to use other values, use a second function.
// Authenticates user. Returns whether authentication is successful.
bool AuthUser(const FString& options,  // Argument passed in PreLogin step.
              FString &error_message);  // Error message for failed auth.

// If you changed the field name for user id and token, use this function.
bool AuthUser(const FString& options,  //  Argument passed in PreLogin step.
              const FString& uid_field,  // Field name for an uid
              const FString& token_field,  // Field name for a token
              FString &error_message);  // Error message for failed auth.
For example, invoke as follows:
// If you are using the default fields.
if (!fun::FunapiDedicatedServer::AuthUser(Options, ErrorMessage)) {
  // Handle authentication failure.
}

// If you use non-default fields.
if (!fun::FunapiDedicatedServer::AuthUser(Options,
                                          "FunapiUID",
                                          "FunapiToken",
                                          ErrorMessage)) {
  // Handle authentication failure.
}
47.4.5. Reporting game results
When the game ends, data is created and sent to the game server in JSON format. Use the following function.
void PostResult(const FString &json_string, const bool use_exit);
If use_exit is true, the dedicated server shuts down after results are reported.
For example, invoke as follows to report game results:
fun::FunapiDedicatedServer::PostResult(
    FString("{ \"foo\":\"bar\"}"), false);
Game results sent here are handled in server code as explained in 게임 결과 처리하기.
48. 데디케이티드 서버 처리하기 (유니티3D)
데디케이티드 서버에서 게임 서버와 통신하는데 필요한 부분은 유니티3D 플러그인의
FunapiDedicatedServer 클래스 함수로 제공합니다.
Tip
유니티 데디케이티드 서버는 UDP 프로토콜을 사용하므로 방화벽에서 UDP 프로토콜을 허용하게 설정해야 해야 합니다. 유니티 네트워크에 대한 설명은 All about the Unity networking transport layer 글을 참고해주세요.
Important
유니티 데디케이티드 서버는 FUNAPI_DEDICATED_SERVER 심볼을 정의한 상태에서 빌드해야 합니다.
위 심볼을 정의하지 않고 빌드할 경우 데디케이티드 서버 관련 코드가 동작하지 않습니다.
심볼을 정의하는 방법은 Unity Plugin 로그 보기 항목을 참고해 주세요.
48.1. 명령행 인자 처리
bool FunapiDedicatedServer.Init();
해당함수를 호출해서 데디케이디드 서버를 시작할 때 명령행으로 전달한 인자를
처리합니다. 형식이 잘못되거나 필요한 인자가 없는 경우 false 를 반환합니다.
48.2. 데디케이티드 서버 시작
void FunapiDedicatedServer.Start(string version);
위 API를 호출하면 데디케이티드 서버 초기화를 시작합니다. 초기화 과정은 버전 확인 및 프로세스 인자 확인 등을 포함합니다. 올바른 버전 형식(x.y.z.r)을 지정하지 않으면 초기화에 실패하며 데디케이티드 서버를 종료합니다.
Note
void FunapiDedicatedServer.Start(string version) 함수는
bool FunapiDedicatedServer.Init() 함수와
void FUnapiDedicatedServer.Start() 함수를 통합한 새로운 함수입니다(기존
함수들은 지원을 중단할 예정입니다). version 인자로는
FunapiDedicatedServer.version 에 지정했던 버전값을 다음과 같은 형태로
넣어주면 됩니다.
기존 : "{ \"version\": \"1.0.0.1\" }" -> 변경 : "1.0.0.1"
48.3. 콜백 함수 추가하기
데디케이티드 서버에서는 게임 상태를 관리할 수 있도록 여러 콜백 함수를 제공합니다.
// 데디케이티드서버 초기화가 정상적으로 진행되었을 때 호출됩니다.
event Action StartCallback;

// 새로운 유저가 이 데디케이티드 서버로 접속할 수 있을 때 호출됩니다.
// 유저 난입은 데디서버 매니저에서 처리할 수 있습니다.
// 여러 유저가 동시에 추가된 경우 추가된 순서대로 콜백을 호출합니다.
event Action<string /*uid*/, string /*json_string*/> UserDataCallback;

// 매치 데이터가 업데이트됐을 때 호출됩니다.
// 데디서버 매니저에서 유저 난입 시 match_data 를 업데이트한 경우 호출합니다.
// 여러 유저가 동시에 추가된 경우 추가된 순서대로 콜백을 호출합니다.
event Action<string /*json_string*/> MatchDataCallback;

// 데디케이티드서버와 데디서버 호스트 매니저의 연결이 끊겼을 때 호출됩니다.
event Action DisconnectedCallback;
다음과 같이 사용할 수 있습니다.
FunapiDedicateServer.StartCallback += delegate ()
{
    // 데디케이티드서버 시작 후 필요한 코드를 추가합니다.
    ...
};

FunapiDedicateServer.UserDataCallback +=
        delegate (string uid, string json_string)
{
    // 업데이트 된 유저 데이터에 대한 코드를 추가합니다.
    ...
};

FunapiDedicateServer.MatchDataCallback += delegate (string json_string)
{
    // 업데이트 된 매치 데이터에 대한 코드를 추가합니다.
    ...
};

FunapiDedicateServer.DisconnectedCallback += delegate ()
{
    // 게임 관련 정보들을 추후 반영하기 위해 파일로 저장하거나
    // 접속 중인 사용자들과 연결을 끊고 종료 처리를 할 수 있습니다.
    ...
};
48.4. 사용자 명령줄 실행인자 가져오기
데디케이티드 서버는 프로세스 실행 시 지정했던 인자들을 가져올 수 있습니다. 인자를 가져오는 방법은 다음과 같습니다.
Note
사용자 명령줄 실행인자는 데디서버 매니저에서 추가할 수 있습니다.
List<string> user_cmd_options;
위 API를 통해 추가 인자들을 가져올 수 있습니다. 다음과 같이 사용할 수 있습니다.
foreach (string cmd in FunapiDedicatedServer.user_cmd_options)
{
    // 각 커맨드에 대한 처리를 해줍니다.
    ...
}
48.5. 매치 혹은 유저 데이터 얻기
// 유저 데이터를 얻습니다.
string GetUserDataJsonString(string uid);

// 매치 데이터를 얻습니다.
string GetMatchDataJsonString();
uid 에 해당하는 유저 데이터와 매치 데이터를 JSON 형식으로 반환합니다.
48.6. 접속한 유저 인증 처리
bool AuthUser(string uid, string token);
uid 에 해당하는 유저가 인증 토큰 token 을 전달해온 경우 맞는 값인지
검사합니다.
48.7. 데디케이티드 서버가 준비되면 알려주기
void SendReady(
        Action<int /*response_code*/, string /*error_desc*/> callback);
데디케이티드 서버 초기화가 끝난 후 서버를 사용할 준비를 마치면 SendReady 함수를
호출합니다. 이 함수를 호출하면 클라이언트가 접속을 시작할 수 있습니다.
다음과 같이 사용할 수 있습니다.
SendReady("uid", delegate (int response_code, string error_desc)
{
    if (response_code == 0)
    {
        // 이 시점부터 클라이언트가 접속할 수 있습니다.
    }
    else
    {
        Debug.Log("error_desc={0}", error_desc);
        // 연결에 실패한 경우 0 이외의 응답 코드를 반환합니다.
        // 이 시점부터는 데디서버 호스트 매니저와 로컬 통신이 불가능하므로
        // 더 이상 게임 진행 상태를 게임 서버로 전달 할 수 없습니다.
        // 게임 관련 정보들을 추후 반영하기 위해 파일로 저장하거나
        // 접속 중인 사용자들과 연결을 끊고 종료 처리를 할 수 있습니다.
        ...
    }
});
Note
void Ready() 함수는 void SendReady(Action<int, string> callback) 와
동일한 기능을 하지만 콜백을 추가할 수 없어 메시지를 실제로 보냈는지 확인할 방법이
없습니다. 이와 같은 이유로 콜백이 없는 Ready() 함수와 Send...() 함수들은
지원을 중단할 예정입니다.
48.8. 유저 진입/이탈 전달하기
void SendJoined(
        string uid,
        Action<int /*response_code*/, string /*error_desc*/> callback);

void SendLeft(
        string uid,
        Action<int /*response_code*/, string /*error_desc*/> callback);
위 API를 사용해서 특정 유저 (uid) 가 진입/이탈했다는 정보를 게임 서버에 전달합니다.
다음과 같이 사용할 수 있습니다.
SendJoined("uid", delegate (int response_code, string error_desc)
{
    if (response_code == 0)
    {
        // 유저 진입 정보를 성공적으로 전달했습니다.
    }
    else
    {
        Debug.Log("error_desc={0}", error_desc);
        // 연결에 실패한 경우 0 이외의 응답 코드를 반환합니다.
        // 이 시점부터는 데디서버 호스트 매니저와 로컬 통신이 불가능하므로
        // 더 이상 게임 진행 상태를 게임 서버로 전달 할 수 없습니다.
        // 게임 관련 정보들을 추후 반영하기 위해 파일로 저장하거나
        // 접속 중인 사용자들과 연결을 끊고 종료 처리를 할 수 있습니다.
        ...
    }
});

SendLeft("uid", delegate (int response_code, string error_desc)
{
    if (response_code == 0)
    {
        // 유저 이탈 정보를 성공적으로 전달했습니다.
    }
    else
    {
        Debug.Log("error_desc={0}", error_desc);
        // 연결에 실패한 경우 0 이외의 응답 코드를 반환합니다.
        // 이 시점부터는 데디서버 호스트 매니저와 로컬 통신이 불가능하므로
        // 더 이상 게임 진행 상태를 게임 서버로 전달 할 수 없습니다.
        // 게임 관련 정보들을 추후 반영하기 위해 파일로 저장하거나
        // 접속 중인 사용자들과 연결을 끊고 종료 처리를 할 수 있습니다.
        ...
    }
});
48.9. 게임 상태 보내기
void SendGameState(
        string json_string,
        Action<int /*response_code*/, string /*error_desc*/> callback);
위 API를 사용해서 현재 게임 상태를 게임 서버에 전달합니다. 다음과 같이 사용할 수 있습니다.
SendGameState("state", delegate (int response_code, string error_desc)
{
    if (response_code == 0)
    {
        // 현재 게임 상태를 게임 서버로 성공적으로 전달했습니다.
    }
    else
    {
        Debug.Log("error_desc={0}", error_desc);
        // 연결에 실패한 경우 0 이외의 응답 코드를 반환합니다.
        // 이 시점부터는 데디서버 호스트 매니저와 로컬 통신이 불가능하므로
        // 더 이상 게임 진행 상태를 게임 서버로 전달 할 수 없습니다.
        // 게임 관련 정보들을 추후 반영하기 위해 파일로 저장하거나
        // 접속 중인 사용자들과 연결을 끊고 종료 처리를 할 수 있습니다.
        ...
    }
});
48.10. 사용자 정의 데이터 보내기
void SendCustomCallback(
        string json_string,
        Action<int /*response_code*/, string /*error_desc*/> callback);
위 API를 사용해서 사용자 정의 JSON 데이터를 게임 서버에 전달합니다. 다음과 같이 사용할 수 있습니다.
SendCustomCallback("custom", delegate (int response_code, string error_desc)
{
    if (response_code == 0)
    {
        // 사용자 정의 데이터를 성공적으로 전달했습니다.
    }
    else
    {
        Debug.Log("error_desc={0}", error_desc);
        // 연결에 실패한 경우 0 이외의 응답 코드를 반환합니다.
        // 이 시점부터는 데디서버 호스트 매니저와 로컬 통신이 불가능하므로
        // 더 이상 게임 진행 상태를 게임 서버로 전달 할 수 없습니다.
        // 게임 관련 정보들을 추후 반영하기 위해 파일로 저장하거나
        // 접속 중인 사용자들과 연결을 끊고 종료 처리를 할 수 있습니다.
        ...
    }
});
48.11. 게임 결과 보고하기
게임이 끝나면 JSON 형식으로 게임 서버에게 보낼 데이터를 만들어서 전송합니다. 아래 함수를 이용합니다.
void SendResult(
        string json_string,
        Action<int /*response_code*/, string /*error_desc*/> callback);
게임 서버에 보내는 데이터는 유효한 JSON 데이터여야 합니다. 다음과 같이 사용할 수 있습니다.
SendResult("result", delegate (int response_code, string error_desc)
{
    if (response_code == 0)
    {
        // 데디케이티드 서버는 자동으로 종료하지 않으므로 결과를 성공적으로
        // 보낸 후 종료해야 합니다.
#if UNITY_EDITOR
        // 에디터인 경우
        UnityEditor.EditorApplication.Exit(0);
#else
        // 에디터가 아닌 경우
        Application.Quit();
#endif
    }
    else
    {
        Debug.Log("error_desc={0}", error_desc);
        // 연결에 실패한 경우 0 이외의 응답 코드를 반환합니다.
        // 이 시점부터는 데디서버 호스트 매니저와 로컬 통신이 불가능하므로
        // 더 이상 게임 진행 상태를 게임 서버로 전달 할 수 없습니다.
        // 게임 관련 정보들을 추후 반영하기 위해 파일로 저장하거나
        // 접속 중인 사용자들과 연결을 끊고 종료 처리를 할 수 있습니다.
        ...
    }
});
49. 게임 결과 처리하기
Reporting game results 에서 보내는 PostResult / SendResult 결과는
게임 서버에서 등록한 콜백 함수에서 받아 처리할 수 있습니다.
#include <funapi/service/dedicated_server_manager.h>


// 게임 결과를 처리하는 콜백 함수입니다.
void result_callback(const fun::Uuid &match_id,
                     const fun::Json &match_data,
                     bool success) {
    // 게임 결과 처리를 수행합니다.
}

// 콜백을 등록합니다. 게임 서버의 ``Install()`` 또는 ``Start()`` 함수 등에서
// 등록하는 게 좋습니다.
DedicatedServerManager::RegisterMatchResultCallback(result_callback);
match_data 는 데디케이티드 서버가 전송한 JSON 데이터를 그대로 포함합니다.
매치(게임 세션) ID 와 이 값을 적절히 처리하거나, 데이터베이스에 저장할 수 있습니다.